
 Portal
DON"T PAY ATTENTION TO THIS THREAD
2 posters
Page 1 of 1

DON"T PAY ATTENTION TO THIS THREAD
![]() by xcaldazar Mon May 03, 2010 2:54 am
by xcaldazar Mon May 03, 2010 2:54 am
This is for Miriya to read since the other forum I posted it on first has to verify it since it was in a stickied section I posted it to.
TOC
1.Introduction
2.Tools
3.Trunk
4.Rear Seats
5.Doors
6.Front Floors
7.Dashboard
8.Roof
9.Conclusion
1.INTRODUCTION
My name is Taylor, I'm fairly new to the forums. I wanted to give back to the community since I have already found this forum to be very helpful in multiple situations. I have only had my '02 GTS for a few months, but I am really happy with it.
I took quite a few pictures of my install when I sound deadened my car. I did it a little at a time. Starting with the trunk and moving to the front. I'll try to break the sections up appropriately, I wish I knew how to do spoilers on this forum, maybe I should just put thumbnails to make it easier to read and find stuff. I used[URL="http://www.raamaudio.com/"] Raammat[/URL], using the RAAMmat BXT , and the Ensolite IUO Peal and Stick. The Peal and Stick was very easy to install. I was happy I went with that over the spray (they were out of stock when I ordered). I was very careful not to cover any wires, what I learned is make sure you don't cover the holes for the screws either. Ended up taking many parts off multiple times to poke around with pointy objects until I found the hole.
2.TOOLS
Basic tools used:
Screw Driver
Phillips (for most screws)
Flat Head (for popping off those plastic pieces)
Socketed Wrench
I don't remember the sizes needed, but mm of course.
Heat Gun (only at first really seemed like overkill, stuck really well already)
Weight Lifting Belt (Helped support my lower back, a lot less aching afterward)
Hands
Clothes that can get dirty, that black stuff doesn't come off easy.
Razor blade
Heavy Duty Scissors


3.TRUNK
So here are all the pictures I took of the trunk section. Mostly how I got it apart. It took me over a month to complete this project, a section every couple weekends when I had the chance. So I don't remember all of what I did. I tried to cut as large as pieces as possible. One big annoyance I had was that nearly nothing is nice and square or flat. So I learned to lay down slowly and make sure I press the Raammat down along each angle and ridge the car's frame has.
Most of these are just pictures of the screws and bolts that I needed to remove to get each plastic panel off.


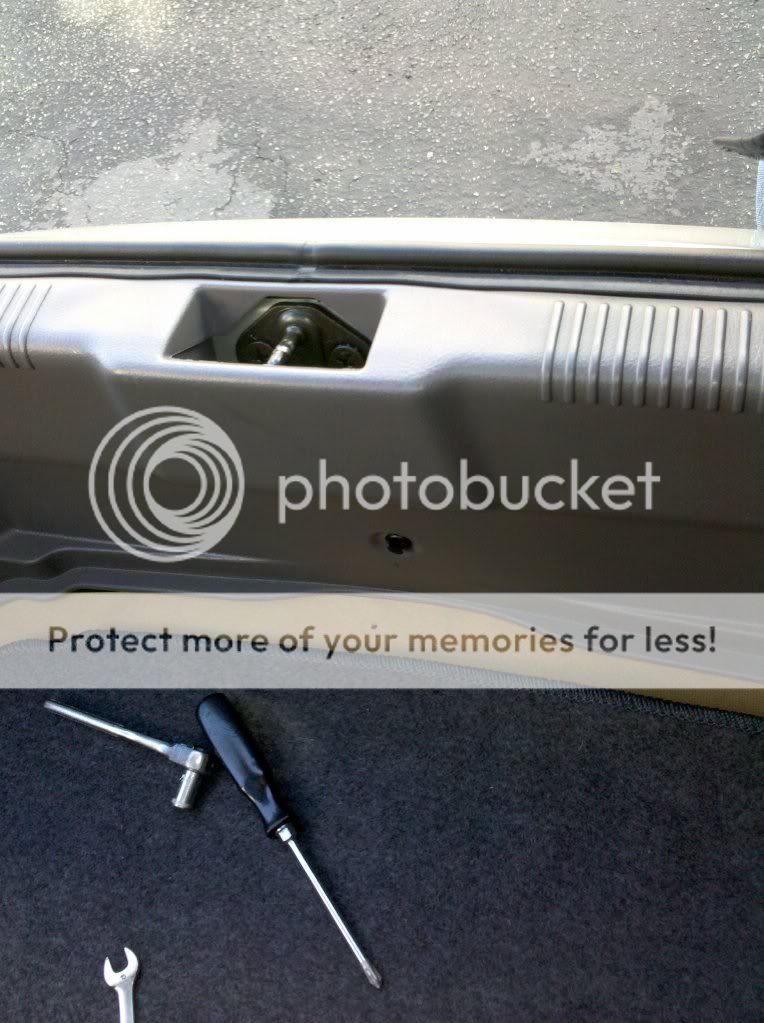


Above and below you can see how the wheel well is not totally smoothed out and neither is the floor. These bumps are where you need to make sure the Raammat is getting contact as you lay it down.

I reached up back into where the jack was to install the Raammat, since this area resonated a lot when I would tap on it with my fingers. I would fold off part of the backing, usually the side that would be farthest from my reach, then press it down and slowly pull of the rest of the backing. Otherwise the Raammat will stick to other pieces as you try to place it back there.

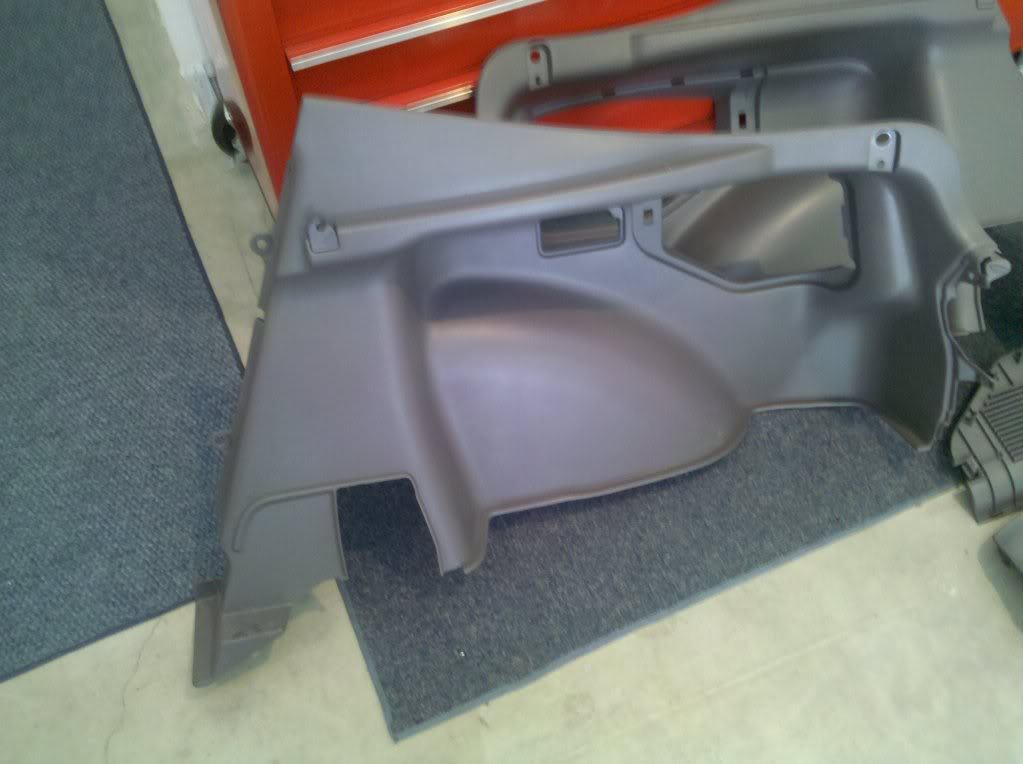
4.REAR SEATS
I have more pictures of the actual installing part for this. I believe the trunk's plastics needs to be off in order to get the plastics off the sides and the seats out. First are pictures of the bolts holding the chairs in from behind. By far the biggest headache of this whole ordeal was the bolts for the back seats. They weren't too bad to get out, but I forgot to make holes for them and I had a hell of a time lining them back up afterward. One thing to think about is a lot of things are slightly off since they are raised just a little more than normal.


These are pictures of the scuff plate. I was weary of pulling this off at first since it made loud popping/cracking noises. Now when I need to get to something I just yank it right off. Its all plastic clips holding it on and they pop out pretty easy. I just used my bare hands no tools involved. Although I'm sure someone could do it more carefully if wanted. Figured I would take some pics so you can see where the clips are located.


Below is the reason I took the scuff plates off. They overlap with the large plastic piece that covers the whole side in the back. So without popping those off first it may band or break the overlapped part.


This little yellow piece is significant. I don't have pictures of the seats, but there is U shaped metal that clips into these yellow spots. You have to just yank them up and out. Takes a decent amount of force. At least that is how I got them out. Later you need to remove these to get the carpet up as well.


I took some of these pics for random reasons. Maybe some can still help people so I won't leave any out. You may notice parts of the trunk finished in the background, I put the closed cell foam over the Raammat. I don't know what this black thing was under my seats right above my hand in the picture. That confused me so I took a picture. lol.


Nearly finished with the back seats, I did add the closed cell foam before putting it back together. I also put extra Raammat and closed cell foam on the wheel wells since I hear lots of noise from the tires.


5.DOORS
This section is probably the best documented photo wise. Unfortunately there are many how to guides for doors out there. So I think the photos would have been of more use elsewhere. The first shot shows what happens when you slip up trying to get the plastic circles covering your screws out. Nice gash in the plastic, most people don't notice it though. My girlfriend drives with me more than anyone and it took her months to notice it.
The beginning pictures all show where the bolts and screws are that need to be taken off to get the door plastics off. Then there are the pictures for the innards of the door. The blue tape is a general shape of the door and I left the screws near the areas they belong in. Helps me remember.


For the insides there are all the usual problems amplified. More wires, more holes for screws, and more bumpy layout. Plus there is this moisture shield that needs to be removed. It can be messy and it is delicate. This is best done slowly with very little background stress. It will take time, patience and a delicate hand. You need to cut the black goop that holds it on while slowly and gently pulling on the plastic. Otherwise you get a stringy torn up mess that will not go back on properly. Just work your way around it, and try not to go too quickly. There starts to be a pattern to it after a while.
To get the moisture shield off completely you will need to unplug as many of the wires a possible. You can get it off with just barely stretching it over the door handle. Some people may just throw it out and say screw it. But I figure it has to be there for a pretty decent reason since it came with it.


Now onto installing the sound deadening materials.


The picture below I intentionally covered the hole to a screw or bolt and then used the razor to cut lines across it, then pushing the sliced pieces back and securing them to the other side. Then the photo below that shows how I would take a large piece and if the bumps threw off laying it flat, I would put some cuts into it to allow spots to slightly overlap. It made me think of how a map of the world isn't square if the north and south is drawn to scale, instead its kind of cut up, hope that makes sense. Anyways with lots of places that resonated a lot before the Raammat I put double doses on at times. I also put it on the backs of the door handles, since I noticed the rattled quite a bit with the music up loud.


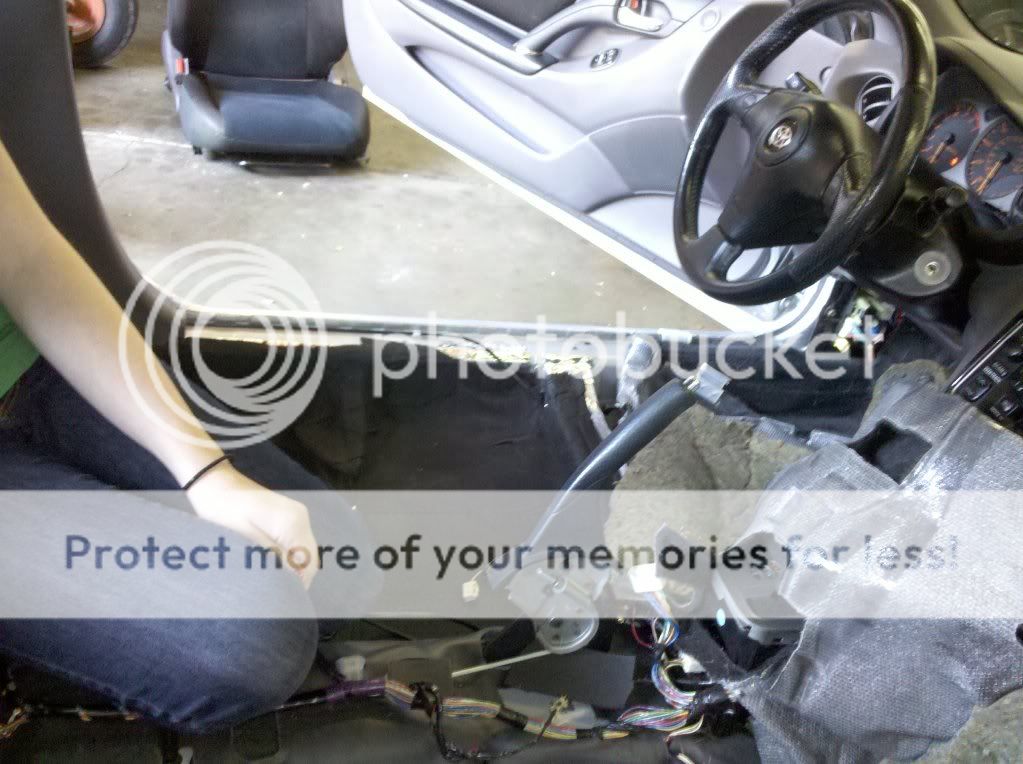
6.FRONT FLOORS
I didn't have many pictures of this part of the install because I was pressed for time at the end and forgot to take pictures in the beginning. The little tabs I mentioned earlier come into play here, when you are trying to get up the carpet right below the back seats. I'll post the same picture to give you and idea instead of searching for the right photo.
This section was one of the easiest. The center console was probably the hardest part. There are two screws on the sides holding it in place, two in bottom of the compartment to hold stuff, and two holding it to the air conditioning controls. You may need to also remove the window controls. There are some other guides out there on removing the center console which might give you a better idea of what screws I am talking about. The emergency brake needs to be pulled up far, and the car shifted into something other than park. Just pop that little oval plastic next to the shifter (on automatics at least) and compress the button underneath to freely change gears.
Don't place too sound deadening materials much under where the dead pedal goes or it will not snap back into place very easy.
I thought this one may help as well. http://www.newcelica.org/forums/showthread.php?t=132615


7.DASHBOARD
Didn't do this one, figured it would be too much work. Although the front wheel wells do still create descent amounts of noise on the cement parts of the freeway. If someone else has I would gladly add that info here so people don't have to look around as much to find it.
8.ROOF
Didn't do this one, but I may in the future. I am mostly satisfied with the sound deadening I now have and didn't find the roof necessary. If someone else has I would gladly add that info here so people don't have to look around as much to find it.
9.CONCLUSION
Overall I was very happy with my install, it took a lot of time and work to get it done though. Definitely a bigger project than I had expected. When I did use the heat gun to make it adhere better it smelled more as well. This smell really wasn't bad, and went away fast. One friend said it smelt like new car. I think it is from the rubber or plastic melting in the compound as I heated it. I did get cut a few times from the Raammat, but it really wasn't bad. My speakers now sound great and I added a sub, which barely rattles a thing. I know more weight means less mpg and less acceleration, but for the how much difference it made it was totally worth it to me.
Constructive criticism welcomed, hope this is a help to someone.
Related info for search:
Dynamat
Raammat
B-Quiet
Sound Deaden
Road Noise
Guide
Install
Butyl
hushmat
ensolite
Brown Bread
TOC
1.Introduction
2.Tools
3.Trunk
4.Rear Seats
5.Doors
6.Front Floors
7.Dashboard
8.Roof
9.Conclusion
1.INTRODUCTION
My name is Taylor, I'm fairly new to the forums. I wanted to give back to the community since I have already found this forum to be very helpful in multiple situations. I have only had my '02 GTS for a few months, but I am really happy with it.
I took quite a few pictures of my install when I sound deadened my car. I did it a little at a time. Starting with the trunk and moving to the front. I'll try to break the sections up appropriately, I wish I knew how to do spoilers on this forum, maybe I should just put thumbnails to make it easier to read and find stuff. I used[URL="http://www.raamaudio.com/"] Raammat[/URL], using the RAAMmat BXT
, and the Ensolite IUO Peal and Stick. The Peal and Stick was very easy to install. I was happy I went with that over the spray (they were out of stock when I ordered). I was very careful not to cover any wires, what I learned is make sure you don't cover the holes for the screws either. Ended up taking many parts off multiple times to poke around with pointy objects until I found the hole.2.TOOLS
Basic tools used:
Screw Driver
Phillips (for most screws)
Flat Head (for popping off those plastic pieces)
Socketed Wrench
I don't remember the sizes needed, but mm of course.
Heat Gun (only at first really seemed like overkill, stuck really well already)
Weight Lifting Belt (Helped support my lower back, a lot less aching afterward)
Hands
Clothes that can get dirty, that black stuff doesn't come off easy.
Razor blade
Heavy Duty Scissors
3.TRUNK
So here are all the pictures I took of the trunk section. Mostly how I got it apart. It took me over a month to complete this project, a section every couple weekends when I had the chance. So I don't remember all of what I did. I tried to cut as large as pieces as possible. One big annoyance I had was that nearly nothing is nice and square or flat. So I learned to lay down slowly and make sure I press the Raammat down along each angle and ridge the car's frame has.
Most of these are just pictures of the screws and bolts that I needed to remove to get each plastic panel off.
Above and below you can see how the wheel well is not totally smoothed out and neither is the floor. These bumps are where you need to make sure the Raammat is getting contact as you lay it down.
I reached up back into where the jack was to install the Raammat, since this area resonated a lot when I would tap on it with my fingers. I would fold off part of the backing, usually the side that would be farthest from my reach, then press it down and slowly pull of the rest of the backing. Otherwise the Raammat will stick to other pieces as you try to place it back there.
4.REAR SEATS
I have more pictures of the actual installing part for this. I believe the trunk's plastics needs to be off in order to get the plastics off the sides and the seats out. First are pictures of the bolts holding the chairs in from behind. By far the biggest headache of this whole ordeal was the bolts for the back seats. They weren't too bad to get out, but I forgot to make holes for them and I had a hell of a time lining them back up afterward. One thing to think about is a lot of things are slightly off since they are raised just a little more than normal.
These are pictures of the scuff plate. I was weary of pulling this off at first since it made loud popping/cracking noises. Now when I need to get to something I just yank it right off. Its all plastic clips holding it on and they pop out pretty easy. I just used my bare hands no tools involved. Although I'm sure someone could do it more carefully if wanted. Figured I would take some pics so you can see where the clips are located.
Below is the reason I took the scuff plates off. They overlap with the large plastic piece that covers the whole side in the back. So without popping those off first it may band or break the overlapped part.
This little yellow piece is significant. I don't have pictures of the seats, but there is U shaped metal that clips into these yellow spots. You have to just yank them up and out. Takes a decent amount of force. At least that is how I got them out. Later you need to remove these to get the carpet up as well.
I took some of these pics for random reasons. Maybe some can still help people so I won't leave any out. You may notice parts of the trunk finished in the background, I put the closed cell foam over the Raammat. I don't know what this black thing was under my seats right above my hand in the picture. That confused me so I took a picture. lol.
Nearly finished with the back seats, I did add the closed cell foam before putting it back together. I also put extra Raammat and closed cell foam on the wheel wells since I hear lots of noise from the tires.
5.DOORS
This section is probably the best documented photo wise. Unfortunately there are many how to guides for doors out there. So I think the photos would have been of more use elsewhere. The first shot shows what happens when you slip up trying to get the plastic circles covering your screws out. Nice gash in the plastic, most people don't notice it though. My girlfriend drives with me more than anyone and it took her months to notice it.
The beginning pictures all show where the bolts and screws are that need to be taken off to get the door plastics off. Then there are the pictures for the innards of the door. The blue tape is a general shape of the door and I left the screws near the areas they belong in. Helps me remember.
For the insides there are all the usual problems amplified. More wires, more holes for screws, and more bumpy layout. Plus there is this moisture shield that needs to be removed. It can be messy and it is delicate. This is best done slowly with very little background stress. It will take time, patience and a delicate hand. You need to cut the black goop that holds it on while slowly and gently pulling on the plastic. Otherwise you get a stringy torn up mess that will not go back on properly. Just work your way around it, and try not to go too quickly. There starts to be a pattern to it after a while.
To get the moisture shield off completely you will need to unplug as many of the wires a possible. You can get it off with just barely stretching it over the door handle. Some people may just throw it out and say screw it. But I figure it has to be there for a pretty decent reason since it came with it.
Now onto installing the sound deadening materials.
The picture below I intentionally covered the hole to a screw or bolt and then used the razor to cut lines across it, then pushing the sliced pieces back and securing them to the other side. Then the photo below that shows how I would take a large piece and if the bumps threw off laying it flat, I would put some cuts into it to allow spots to slightly overlap. It made me think of how a map of the world isn't square if the north and south is drawn to scale, instead its kind of cut up, hope that makes sense. Anyways with lots of places that resonated a lot before the Raammat I put double doses on at times. I also put it on the backs of the door handles, since I noticed the rattled quite a bit with the music up loud.
6.FRONT FLOORS
I didn't have many pictures of this part of the install because I was pressed for time at the end and forgot to take pictures in the beginning. The little tabs I mentioned earlier come into play here, when you are trying to get up the carpet right below the back seats. I'll post the same picture to give you and idea instead of searching for the right photo.
This section was one of the easiest. The center console was probably the hardest part. There are two screws on the sides holding it in place, two in bottom of the compartment to hold stuff, and two holding it to the air conditioning controls. You may need to also remove the window controls. There are some other guides out there on removing the center console which might give you a better idea of what screws I am talking about. The emergency brake needs to be pulled up far, and the car shifted into something other than park. Just pop that little oval plastic next to the shifter (on automatics at least) and compress the button underneath to freely change gears.
Don't place too sound deadening materials much under where the dead pedal goes or it will not snap back into place very easy.
I thought this one may help as well. http://www.newcelica.org/forums/showthread.php?t=132615
7.DASHBOARD
Didn't do this one, figured it would be too much work. Although the front wheel wells do still create descent amounts of noise on the cement parts of the freeway. If someone else has I would gladly add that info here so people don't have to look around as much to find it.
8.ROOF
Didn't do this one, but I may in the future. I am mostly satisfied with the sound deadening I now have and didn't find the roof necessary. If someone else has I would gladly add that info here so people don't have to look around as much to find it.
9.CONCLUSION
Overall I was very happy with my install, it took a lot of time and work to get it done though. Definitely a bigger project than I had expected. When I did use the heat gun to make it adhere better it smelled more as well. This smell really wasn't bad, and went away fast. One friend said it smelt like new car. I think it is from the rubber or plastic melting in the compound as I heated it. I did get cut a few times from the Raammat, but it really wasn't bad. My speakers now sound great and I added a sub, which barely rattles a thing. I know more weight means less mpg and less acceleration, but for the how much difference it made it was totally worth it to me.
Constructive criticism welcomed, hope this is a help to someone.
Related info for search:
Dynamat
Raammat
B-Quiet
Sound Deaden
Road Noise
Guide
Install
Butyl
hushmat
ensolite
Brown Bread

xcaldazar- Posts : 83
Join date : 2010-04-17
IGN : IshaCueran
Class : Night Lord
Humor : Twisted
Re: DON"T PAY ATTENTION TO THIS THREAD
![]() by FacelessWolf Tue Aug 10, 2010 6:00 am
by FacelessWolf Tue Aug 10, 2010 6:00 am
OMG! I helped with that! =D And no, I won't ignore this thread...=P

FacelessWolf- Posts : 7
Join date : 2010-08-01
Age : 34
IGN : FaceIessWoIf, xWindWoIfx
Class : Marksman, Wind Archer
Re: DON"T PAY ATTENTION TO THIS THREAD
![]() by xcaldazar Tue Aug 10, 2010 12:51 pm
by xcaldazar Tue Aug 10, 2010 12:51 pm
Lol yes you did, it took quiet a while. I'm going to the shop today actually. taking care of some paperwork. I didn't think anyone else would have cared/known about this on this forum. I posted it hear cuz I wrote it up for another forum but couldn't get the post to go through so I wanted to make sure I had a backup.
xcaldazar- Posts : 83
Join date : 2010-04-17
IGN : IshaCueran
Class : Night Lord
Humor : Twisted
Page 1 of 1
Permissions in this forum:
You cannot reply to topics in this forum|
|
|